Wednesday, June 8, 2016

How to Fix Temporary Profile in Windows 7

Sometimes Windows 7 Operating System fails to read the correct user profile properly, and instead, loads with a temporary profile. If you are keen you will see the following message: "You have been logged on with Temporary profile"
This is how you fix the temporary profile problem on Windows 7:
A. Before do anything, restart the computer 2 or 3 times to see whether it’s going back to your old correct profile. If this doesn’t work, go to the next step.
B. Rename the temp profile registry and revert back the old registry settings for the correct profile. This methods works especially if the profile is not completely corrupt,.
1. Log in with temp profile.
2. Start registry editor by typing regedit in find box of Windows 7.
3. Navigate the following location.

1. Log in with your temporary profile if your account has administrative rights or with the local administrator account.
2. Start the registry editor by typing regedit in find box of Windows 7.
3. Navigate to HKEY_LOCAL_MACHINE\SOFTWARE\Microsoft\Windows NT\CurrentVersion\ProfileList

Fix Temporary Profile in Windows 7
4. Look for the profile with the ".bak".  This is the CORRECT old profile.
5. Rename the profile that does not have ".bak" by adding "_new" to the end.  You can really add anything to change the name of this profile, just be sure to rename the profile with the matching SID. Next remove the ".bak" from the correct profile.
6. Log off (or restart) and then log back in with the profile that was problematic. You should get your correct profile with icons and profile settings back in Windows 7, (if you are lucky enough).  

If this effort is not successful and Windows 7 computer loads with temporary profile again, it means, most likely, that it created a registry key with .bak again, which suggests the use profile is corrupted and Windows 7 is not reading it properly.

If this happens repair the corrupted files. Usually the corrupted ‘Ntuser’ files cause this issue. 


So, first, re-do all the steps above, then
Run the Check Disk on the partition that contains the user profile and restart the computer.

If this fails to correct the issue, you will need to remove the offending profile and recreate it as follows:

To remove the domain profile and recreate it:
  1. Follow the above steps to clean up the registry, then log in as a local administrator.
  2. Navigate to the profile directory C:\Users\NetID and back up any data that is needed from the profile.
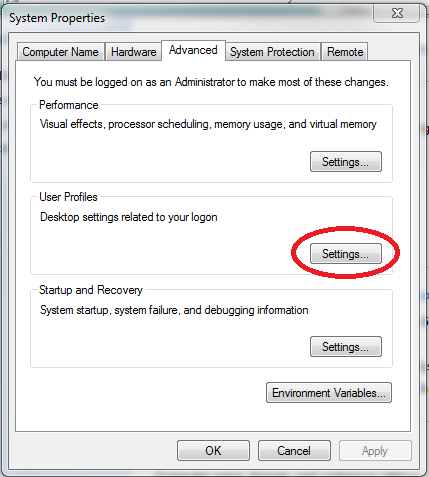
  3. Navigate to All Control Panel Items>>System>>Advanced system settings>>Settings 
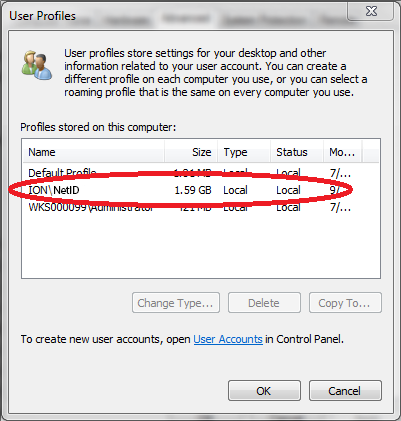
  4. Locate the corrupt profile ION\NetID and Delete this profile.
  5. Navigate to C:\Users and make sure the folder titled by the corrupt profile NetID is gone.  If not, delete this folder.
  6. Log out or restart and log back in using the previously corrupt NetID profile.  Windows will build a new profile for this NetID from the Default profile.
  7. Restore any data to the profile that was previously backed up.


Friday, April 1, 2016

TOP 10 ALTERNATIVES OF INTERNET DOWNLOAD MANAGER (IDM)

Internet Download Manager (IDM) is one of the best resource to download things from the internet, faster and safer. It boosts the download speed by up to 5 times. If your computer were accidentally shutdown, the internet connection lost or any other problem while downloading by which your download would not be able to continue, then IDM provides you the ability to resume those downloads easily. If you are trying to find other download managers out there on the internet then here is a list of 10 Alternatives of Internet Download Manager.

Alternatives of IDM

1. JDownloader

JDownloader is an open-source free software for downloading things from the internet, it has a huge list of developers who work on JDownloader and make the downloads as faster as they should be. Same like Internet Download Manager you can start, pause, resume, and stop downloads. You can also schedule your downloads and can save bandwidth if you uses a limited internet device. It makes the downloads up to 10% faster and saves your precious time.
Jdownloader logo
DAP gives you the fast acceleration on each download with complete set of download tools. DAP have made it even easier to download things faster, smoother and safer. Explore all the features of DAP, download the latest version of DAP by clicking the button below and see why over 293 million users are using DAP as there internet downloads management.

3. Internet Download Accelerator

Internet Download AccelaratorYet another Download management software for your PC to enhance the download speed on each download noticeably. The acceleration is achieved by splitting the file into more parts and download them on the same time gradually in a few minutes. You can also resume your broken downloads, start, pause and stop the downloads on one click action. You can also target the URL to download things from a webpage. If you like to use Internet Download Accelerator click the button below:

4. Orbit Downloader

Orbit Downloader
Orbit Downloader is really a great download manager, it aims to download video/music/files from the most popular social media sites like Myspace, YouTube, Imeem, Pandora, Rapidshare, etc. It makes the general downloading even easier, faster and safer to all. Some of the great key features by Orbit Downloader:
Key Features
  • Download files easily from a webpage
  • Download music, video and streaming media from social media sites
  • Fast acceleration to download
  • Supports RapidShare download
  • Supports all major browsers
  • Supports Metalink to target a download
  • Supports HTTP, HTTPS, MMS, FTP, RTSP and RTMP protocols
  • Proxy server configuration is available
  • Support download pause and resume
  • General download management

5. FreeRapid Downloader

FreeRapid Downloader is available for windows, Linux, MacOS, etc. Stop bearing the default lazy downloading and try something unique. It’s a Java based downloader and aims to download things from Rapidshare, Facebook, Youtube, and other file-sharing services. FreeRapid Downloader lets you add specific links to download by simply adding the link in this software’s add URL option.

6. FlashGet Downloader

FlashGet Best DownloaderFlashGet is the best download manager to download the stuff from the internet into your computer faster, safer and clean from malware, spyware, etc. You can call anti-virus cleaner after completing the installations of FlashGet Downlaoder to clean bugs that will exist in the computer. It boosts the downloading speed by up to 6-10 times.

7. Go!Zilla Downloader

Go!Zilla improves your internet downloading speed on full tilt, Go!Zilla download manager and download accelerator software is for Windows. Here are some key features by Go!Zilla Software:
Key Features
  • You can see what files are in progress and what files have finished
  • Get a file from several servers at once for faster download speeds
  • Resume previous downloads file if your internet had lost connections, crashes, reboots, last time
  • Works within your web browser to make downloading simple
  • Quickly grab batches of files from a web site, ftp server, or even a podcast
  • Includes download technology used by millions of people all over the world to download Billions of files
  • Supports HTTP, FTP, BitTorrent, HTTPS, FTPS protocols; and all major web browsers
  • Works with any Internet connection: modem, Wireless, DSL, Cable or anything else.

8. Download Accelerator Manager (DAM)

Download Accelerator Manager (DAM) enable us to download not only internet files but also web media files from such most popular sites like YouTube, Vimeo, DailyMotion, etc at maximum speed. DAM is one of the best downloading software like IDM to grab videos and audio musics from a webpage. It works in all major web browsers. DAM is blazing fast, clean and easy to use.
To download DAM click the button right over here:

9. GetRight Download Manager

With GetRight Download Manager schedules, resumes and accelerates your downloads. You don’t need to worry about your web connection on failing in the middle of the download. GetRight has been a leader and an innovator among other download manager softwares.

10. Mipony Download Manager

Mipony is completely free software and designed to download files from free hosting webpages like Fileserve, Rapidshare, Hotfiles etc. With Mipony download manager, you don’t need to worry about managing your downloads after all Mipony takes care of your every download.

Sunday, February 14, 2016

What is a fully qualified domain name (FQDN)?

A fully qualified domain name (FQDN) is the complete domain name for a specific computer, or host, on the Internet. The FQDN consists of two parts: the hostname and the domain name. For example, an FQDN for a hypothetical mail server might be help.mydomain.com. The hostname is help, and the host is located within the domain mydomain.com.
In this example, .com is the top-level domain (TLD). This is similar to the root directory on a typical workstation, where all other directories (or folders) originate. (Within the .com TLD, the company, Tonnytipper, has been assigned the tonnytipper.com domain, and has authority to create subdomains within it.)
The same applies to web addresses. For example, www.tonnytipper.comis the FQDN on the web for Tonnytipper. In this case,www is the name of the host in the tonnytipper.com domain.
When connecting to a host (using an SSH client, for example), you must specify the FQDN. The DNS server then resolves the hostname to its IP address by looking at its DNS table. The host is contacted and you receive a login prompt.
If you are using only the hostname (without the domain information) to connect to a server, the application you're using may not be able to resolve the hostname. This can happen if either the DNS suffix search order in your computer's TCP/IP properties is incorrect, or the DNS table is corrupted. In these cases, entering the host's FQDN will allow DNS to locate the server. Also, if you are trying to connect to a remote host that is not local to your Internet service provider (ISP), you will probably have to use the FQDN. For example, it's unlikely that a DNS server at IU would have a listing for remote hosts at another university or an unrelated ISP.

Friday, January 29, 2016

How to setup your Blogger blog with a custom domain from 1and1.com

The Domain ownership system has been updated and using a 1and1.com domain is now much simpler. use the new instructions here: http://blog.mridey.com/2013/03/how-to-setup-your-blogger-blog-with.html

==============================================

Recently, Blogger added extra security when configuring a blog using a custom domain.
You know need to setup two CNAME values in the DNS settings of your domain for Blogger to recognize your custom domain settings.

Personally, I purchase all my domains with godaddy.com but let's assume for now that you have purchased a domain with 1and1.com and you would like to setup that domain on Blogger.

Warning: If you are using 1and1 hosting services to display a website as well as a Blogger blog, these instructions will disable the website. Please post a comment with your website address and I'll check how these instructions must be updated. If you're using eMail, remember to complete the optional eMail step.

Step 1: Get the DNS settings for Blogger

First, go to www.blogger.com, select your blog and go to the basic settings:


Click on "Add a custom domain" and then on "Switch to advanced settings".
Enter "www." and the domain name you purchased. In my example, "www.mydomainname.com" and press "Save":


As you can see, Blogger returned back an error because of missing CNAME entries in your domain.
Let's see what we need to do to configure these settings.

Copy/paste the CNAME values displayed into a text editor (or keep the Blogger window opened), you will need them in step 2.

Step 2: Configure CloudNS

As 1and1.com DNS system is not able to be configured with the values required by Blogger. you will need an external DNS hosting service. This does not require your to transfer your domain from 1and1.com. We are simply going to stop using 1and1 DNS servers and use CloudNS free DNS service instead.

Go to www.cloudns.net and create an account. once you have verified your email address, you should be able to access the dashboard. It should look like this:


Next in "DNS zones", click "Add new", enter your domain name and press create:


You will get a new DNS zone with the NS records already set:


Now click "Add new record", select CNAME, type "www" and "ghs.google.com":


Note: If you're using a subdomain, like "blog.mydomainname.com" then enter "blog" instead of "www" for the first CNAME pointing to "ghs.google.com".

Then add a second CNAME with the values that were displayed by Blogger on the settings page.
Mine were "dqbhffrggxdu" and "gv-lca7dpm4ctjmlm3l3jhfftuepgwgzosehj7i2gqrg7y7wv37hima.domainverify.googlehosted.com." but yours will be different. They are specific to the domain name your are trying to register.


Finally add four A records with IPs 216.239.32.21216.239.34.21216.239.36.21 and 216.239.38.21. Leave the Host entry empty.


Your final dashboard should look something like this:


Optional eMail step:

If you are using email on the domain, you need to add two additional records in cloudNS to continue using 1and1 mail servers.

The two records should be of type "MX". Leave the "Host" field empty, enter "mx00.1and1.com" in the "Points to" field with a priority of 10, and a second record with "mx01.1and1.com" in the "Points to" field with a priority of 20.

Step 3: Configure 1and1.com

So now, let's go to the 1and1.com Control Panel and configure your domain to use CloudNS for DNS services.

Your control panel should look something like this:


Click the checkbox in front of the domain name and then select DNS -> Edit DNS Settings:


In the next screen, select "DNS" and "My name server" and enter the CloudNS name servers.
They are "ns1.cloudns.net", "ns2.cloudns.net", "ns3.cloudns.net" and "ns4.cloudns.net".


Now press "Ok" and it goes back to the Control Panel. The status of the domain will show "updating" and it can take up to 48h for 1and1.com to complete the update.

Step 4: Configure blogger.com

Once the update is done, go back to blogger.com, back to the Advance settings shown in step 1, enter "www." + your domain name such as "www.mydomainname.com" as the custom blog URL and press save. Blogger will verify your DNS settings and apply the new custom domain.

Note: Remember to enable the "Redirect ...." checkbox if you would like your domain name to also point to your blog like "http://mydomainname.com" without the "www" in front.


You may still need to wait about 48h for all DNS servers to have mirrored the changes and point to Blogger instead of 1and1.com.

I hope this helped. Remember to share this article on Google+ and leave comments if I missed something or some steps need more explanations. Thanks.